How to put clothes on a 3D model
By Oleg Sidorkin, CTO and Co-Founder of Cinevva
You have a character and a clothing asset. How do you turn them into a dressed character that can move?
Placing a shirt over a torso is the first step. The shirt also has to match the character’s proportions, follow the correct joints, retain its materials, and stay clear of the body during animation. Those are separate problems, and solving one does not automatically solve the others.
We explored this workflow for Cinevva’s auto-rigger using a reusable sweater and an existing rigged character. Below, you can inspect the actual stages of that experiment. It is a manually guided prototype with a sweater, plus additional trousers and shorts baselines, on one humanoid frog; automatic clothing for arbitrary uploads remains future work.
Explore the process in 3D
The viewer opens with the fitted and skinned model. Enable Compare before / after to reveal the earlier stage on the left, starting with scale and placement only. The sweater has been sized and positioned near the character, but it still has its original arm pose and is not attached to the skeleton. The right side is fitted and skinned, so it follows the character’s animation.
With comparison enabled, use Comparison stage to move from placement to body alignment, then to the earlier fitted and skinned version. Start at Rest to compare shapes. Press Play to see why fitting and attachment are different steps. Drag either view to orbit both cameras, or inspect the character from behind.
These are saved stages from the experiment, not an artificial “bad” animation. In the first two stages, the unskinned garment stays in place while the body moves. At the third stage, both garments are already fitted and skinned, so the remaining differences are smaller. The later close-up examines those details.
Use Find motion to search the 260-motion universal pack, then choose an Animation to start playback automatically. Use Pause to stop. Try Walk, Jump, Crouch Idle, or Sitting Idle. Clips load on demand and use the same retargeting code as the Rigger. Both comparison figures share the clip’s timeline and the workbench’s root-motion and skin-based grounding rules. The floor grid stays fixed; the full-body camera follows horizontal travel without cancelling vertical pelvis motion. You can keep that motion while changing garments or fitting stages.
Select Diagnostic poses to return to the original pose controls and reproduce the article’s measurement cases. The universal motions are for visual inspection; the collision counts reported here do not establish that clothing is clear during those motions. On an unskinned preparation stage, the clothing stays fixed while the body moves.
The browser plays and retargets prepared animation assets. It does not fit clothing or simulate cloth in real time.
1. Choose clothing you can actually reuse
There are two useful starting points: clothing designed for a particular avatar family, and independent garment meshes that you will adapt to a new body. The first offers a known body, pose, and often an attachment convention. The second offers more freedom, but gives the fitting pipeline more work.
For this experiment we selected MargaretToigo’s fisherman sweater from the MakeHuman Shirts01 collection. That specific asset is listed as CC0. It includes an OBJ mesh, UV texture, material description, and a correspondence file for MakeHuman’s body template. The garment has 2,126 vertices and 4,164 triangles.
Check the actual asset’s rights and contents before treating a download as a reusable wardrobe item. A preview image does not establish that you have a separate garment mesh, usable textures, or permission to distribute a dressed model.
Our sweater’s template correspondence is useful, but it is not universal. It refers to MakeHuman’s body topology. Our frog has a different mesh and skeleton, so importing the OBJ does not apply that correspondence automatically. Body-template correspondence weights are also different from skeletal skin weights.
Try trousers and shorts, too
A sweater tests shoulders and arms. Trousers add a different fitting problem: a waistband surrounding the hips, two legs that move independently, and a crotch that must bridge them. Shorts share the hip problem but end before the knee.
Choose Cargo trousers or Denim shorts. The viewer shows a manually fitted and skinned prototype. Enable Compare before / after to add the scale-and-placement stage on the left. Try Left knee bent and Both knees bent, then orbit behind the character. Show knees marks the same left and right knee joints in both views; Hide clothes exposes the body for a direct stance comparison. Knee-joint positions match exactly in all six checked poses. The differently fitted trouser outlines can otherwise make the knees look closer together. These are two distinct reusable meshes with their original textures, not recolors of the sweater.
Both assets are by Cortu, listed as CC0 in the MakeHuman pants pack. For this experiment we subdivided the low-resolution meshes, mapped their hip and leg regions to the frog’s joints, applied local clearance corrections, and transferred weights from nearby body triangles. The controls replay an authored lower-body diagnostic motion.
The clothing examples are still prototypes. The sweater, trousers, and shorts have different validation results; the fitting lessons below explain what improved and what remains wrong.
2. Establish the body and its rest pose
A fitting system needs to know what the clothing is supposed to surround. In this case, our local rigged frog has an exposed body mesh, long arms, large hands, and a 22-joint humanoid skeleton. That gives us a usable target surface and meaningful shoulder, elbow, wrist, hip, and neck landmarks.
A character already wearing a coat may contain only the coat’s outer surface. It may not have a complete torso underneath. In that situation, the practical choices are to fit an outer layer over the existing geometry, use an explicitly approximate body proxy, or obtain a suitable base body. Joint names alone cannot recover the missing surface.
Before fitting, put the garment and body in the same coordinate frame. Resolve their scale, orientation, object transforms, and rest poses. A garment authored around lowered arms will not match a T-pose merely because their bounding boxes have the same height.
This is also why animation retargeting is not clothing fitting: transferring motion between skeletons does not reshape a shirt around a new chest or resize its sleeves.
3. Fit the garment’s shape to the body
The first demo separates simple placement from a more deliberate alignment. Our prototype reads target landmarks from the skeleton and uses explicit corresponding landmarks on the sweater. A torso deformation and arm mappings provide the initial fit, with continuous blending between arm segments.
The next step applies a bounded surface-clearance correction while smoothing the displacement. The aim is to move overlapping fabric outward without destroying the garment’s shape. This is a simple static fitting baseline, not a fabric solver.
Different input contracts call for different approaches:
| Starting point | Practical fitting route | What still needs checking |
|---|---|---|
| Garment made for the same body template | Apply its known template correspondence or supported body-shape controls | Pose, proportions, and asset-specific assumptions |
| Separate garment and a different body | Align landmarks or a fitting cage, deform the garment, then resolve overlap | Seams, silhouette, clearance, and local stretch |
| Loose or layered clothing | Use a proxy and collision-aware fitting; consider offline cloth simulation | Layer order, self-contact, and preservation of volume |
The table describes possible workflow choices. Our experiments use the second route: landmark fitting for the sweater and trousers, followed by a deformation cage for the shorts. They do not validate every method or garment category.
Preserve design intent while fitting. A loose coat should not collapse onto the body like a painted surface. A skirt needs space around both legs. UV seams and separate layers must not be indiscriminately welded together to make an optimizer’s input easier.
4. Attach the fitted clothes to the rig
After fitting, the garment still needs an answer to a different question: which bones should move each vertex?
Parenting the whole sweater to the character makes it travel with the character, but does not make a sleeve bend at the elbow. Skeletal skinning gives each vertex a weighted combination of joint transforms. For clothing close to the body, the body’s existing weight field is a useful starting point.
For the sweater, our prototype transfers reliable surface weights and fills uncertain regions from trusted neighbors, following the approach described in Robust Skin Weights Transfer via Weight Inpainting. Matches are filtered by geometry, and explicit attachment intent handles ambiguous regions. For a sleeve, a nearby hand is not necessarily the correct weight source. For a glove, it might be.
The trousers and shorts use a simpler nearest-triangle, barycentric transfer of the body’s weights, limited to four joint influences per vertex. That method still needs scrutiny around the crotch and each leg opening.
The result is a garment that follows the existing animation. It does not yet have independent fabric motion. Cloth simulation, spring-driven secondary motion, and baked cloth animation are additional choices, not properties that appear simply because a mesh has skin weights.
In the main demo, compare Scale and place with Fit and transfer weights during playback. That is the distinction between a garment sitting around the character and a garment participating in its pose.
5. Test the dressed character in motion
A rest-pose fit can hide a poor attachment or an intersection that appears when a joint bends. Test the character from front, side, and back, then exercise the motions that stress the garment: raised arms, bent elbows, wrist movement, and—when the clothing reaches them—hips and knees.
Our first real-garment pass showed why several measurements are necessary:
| Stage in the initial fit | Garment triangles crossing the body |
|---|---|
| Simple scaling | 352 |
| Landmark alignment | 495 |
| Surface-clearance correction | 33 |
The landmark stage made the garment’s placement more purposeful, but increased intersections. Surface correction improved the count substantially, yet still did not pass a collision-free rule.
A vertex-only test was even more misleading. It reported zero vertices on the negative side of their nearest body-surface normal, while triangle checks still found crossings. A triangle can pass through the body even when its corners appear to clear a nearby surface.
What the trousers and shorts taught us
The lower-body experiments exposed a failure that a collision score alone cannot catch: a garment can intersect less and still look wrong.
The trousers lost their shape. A clearance-only correction retained oversized hips. Pulling the fabric toward the body removed that flare, but dragged the crotch down and made the trousers resemble a tight, distorted surface. Matching knee-joint positions on both figures did not establish that the clothing fit correctly.
We then fixed the waistband, crotch, knee, and ankle heights and restricted clearance corrections to horizontal movement. That restored the rise, but close front, side, and rear views still showed pinching at the crotch, angular knees, uneven cuffs, and loss of the cargo silhouette. The current trousers retain 53 affected triangles at rest and 50–92 across six sampled poses. The sagging version had fewer intersections—21 at rest—but was not an acceptable fit.
The shorts needed their own constraints. Applying the earlier fitting baseline produced a flared waist, folded crotch, and overly wide leg openings. We replaced independent vertex movement with a 5 × 5 × 5 deformation cage: a coarse grid whose movements deform nearby fabric together. The cage preserves the source mesh and UV seams while keeping the vertical rise fixed. It reduced the jagged folds, but initially left the waistband standing away from the torso.
The next correction identified the waistband’s actual 136-vertex boundary loop and fitted it to torso cross-sections. That improved the side silhouette. Rear inspection then exposed clipping that the boundary and vertex-clearance checks had missed: a fabric triangle can intersect the body between otherwise clear vertices.
The rear waistband needed a triangle-level correction. We tightened the boundary constraints, checked the full waistband strip, and moved only the intersecting garment faces outward against the planes of the body triangles they crossed. The waistband height remained fixed.
| Shorts revision | Whole garment: affected triangles at rest | Rear waistband: affected triangles at rest |
|---|---|---|
| Initial fitting baseline | 143 | Not separately measured |
| Cage fit with the first waistband constraint | 28 | 9 |
| Current rear-waistband correction | 19 | 0 |
The final check found zero rear-waistband crossings in all six sampled poses, with 19 affected triangles elsewhere in every pose. The rear region is defined from the source garment’s triangle centroids; this is a regional result, not approval of the whole pair of shorts. The shorts measurements include both the previous waistband revision and the current correction.
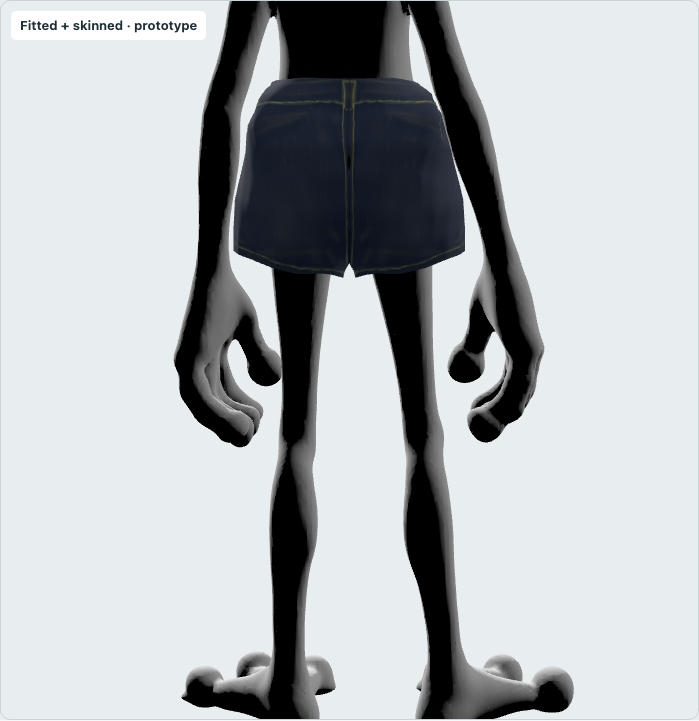
Current rear view. The waistband clipping is corrected in the checked poses; the lower rear-seam defect remains visible. The leg openings also need refinement.
The waistband targets include 14 mm of intended ease around this model. The final boundary differs from those targets by 2.0 mm on average and 5.4 mm at most. Those are fitting parameters and target errors under the scene’s metre convention—not universal tailoring measurements or collision guarantees.
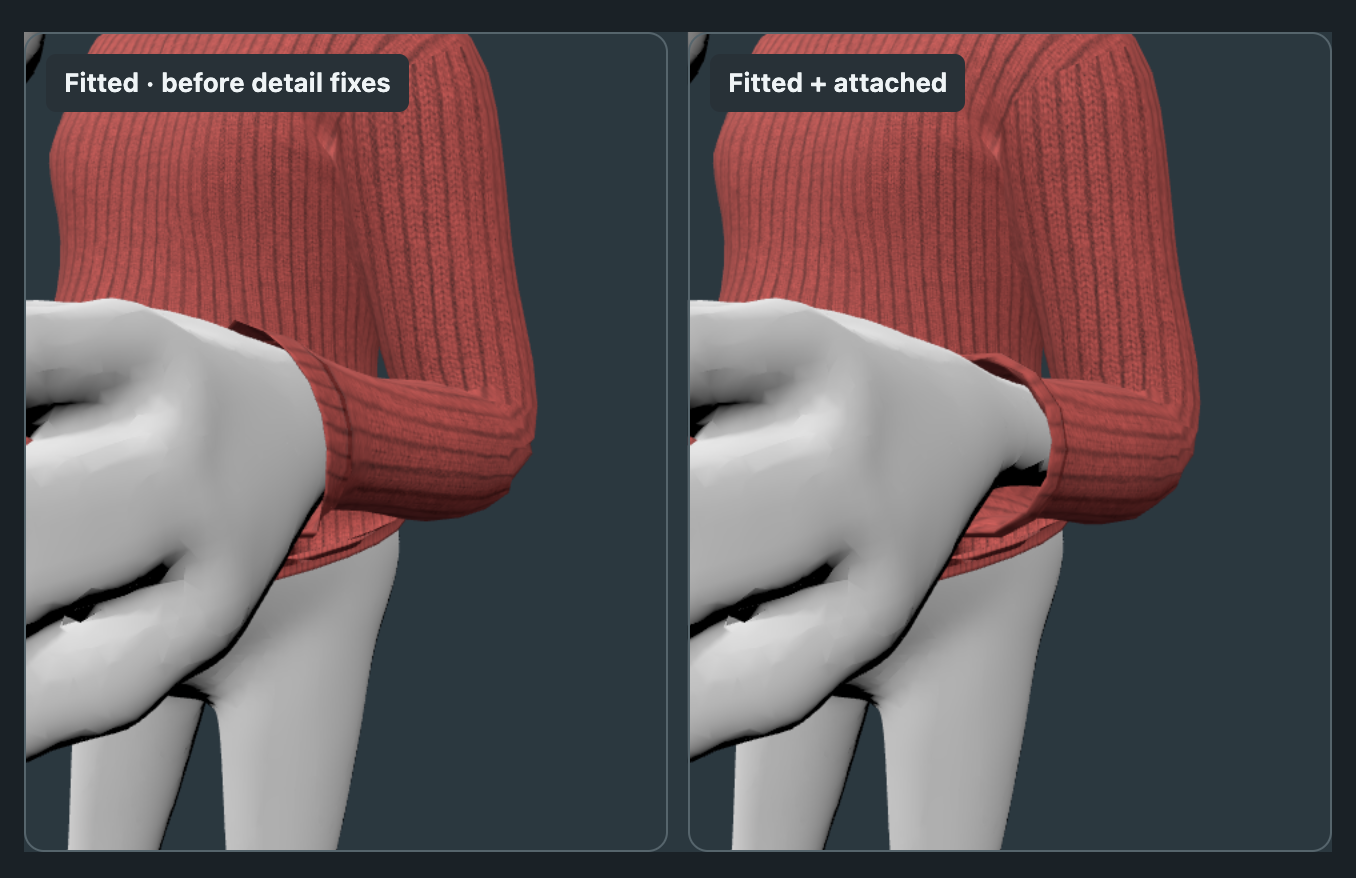
The practical lesson is to give each garment separate requirements for rise, silhouette, seam integrity, attachment, and collision clearance. For shorts, the next work is to constrain each hem around its own thigh and repair the rear seam without disturbing the corrected waistband. Wider walking, sitting, and squatting tests must follow. Discrete checks do not cover self-collision, coplanar contacts, or motion between sampled frames.
A detail check: sleeves and wrists
Sleeves were one revealing failure case within this larger workflow. The earlier fitted sweater looked similar to the refined version at full-character scale. The difference became clearer in close-ups and wrist stress poses.
The viewer below shows the refined cuff. Enable Compare before / after to inspect the earlier cuff alongside it; both are already fitted and skinned. Choose Wrists forward 45° or Wrists back 45°, then inspect the cuff opening. This is a refinement comparison, not the beginning and end of the entire fitting process.
We extracted each cuff’s actual boundary loop, blended the arm mappings through the elbow, and spread the cuff correction into the neighboring fabric. On this frog, moving the openings 50 mm toward the forearms left more room for its large hands. That offset is a parameter tuned to this character, not a universal rule for clothing.
| Inspection pose | Earlier fit: affected sleeve triangles | Refined fit |
|---|---|---|
| Rest | 12 | 0 |
| Elbow bent 75° | 12 | 0 |
| Wrist forward 45° | 79 | 0 |
| Wrist back 45° | 60 | 0 |
The wider test still found one affected sleeve triangle in six of 22 sampled animation frames. The whole garment also retains 21 affected triangles at rest outside the sleeve mask. Four clean inspection poses do not make the outfit collision-free.
These are offline, discrete triangle-crossing measurements. They exclude garment self-intersection, coplanar contacts, and events between sampled frames; the sleeve mask excludes the innermost shoulder transition. The demos do not calculate a live collision score. The sleeve measurements and animation measurements are available separately.
6. Export, reload, and verify
The dressed character needs to survive leaving the fitting tool. Verify geometry, materials, UVs, skeleton binding, and animation in the target viewer or engine.
We exported the result as GLB and loaded it independently in Three.js. The sweater retains its texture and skinning. UV seams increase its exported vertex count from 2,126 to 2,386, which is not itself a geometry failure. The maximum measured rest-surface discrepancy after reload was below 0.001 mm under the file’s metre convention.
That is an export-consistency check, not a claim of physically accurate tailoring. The public Rigger’s complete clothing upload and export workflow has not been integrated or validated by this experiment.
Where AI helps—and what still needs engineering
Human review exposed the dropped trouser crotch, the shorts’ loose waist, and rear clipping that the earlier checks had missed. AI-assisted visual inspection then examined close front, side, and rear views, including temporary plain materials that made mesh defects easier to see. We paired those observations with measured geometry and preserved the failed iterations.
This feedback changed the method: matching skeletons did not prove a good garment shape, clear vertices did not prove clear triangles, and a lower collision count did not justify a distorted silhouette.
This was AI-assisted engineering with explicit landmarks and fitting rules. We did not train a universal garment fitter or prove that a vision model can approve arbitrary outfits.
The next steps are seam and hem constraints for the shorts, a shape-preserving trouser fit, a genuine human base body, and a garment held out from tuning. We also need broader animation tests and an adapter through the real Rigger workflow.
The reusable workflow is already clear: choose a suitable garment → establish the body and rest pose → fit the shape → transfer attachment → test motion and collisions → verify export. The experiment shows a concrete implementation of that process, along with the places where a convincing picture is not enough.